Welcome to the second part of this series of tutorials for projects created by Creative Tim & Under Development Office!
We’re going to setup the development environment for Material Dashboard React, which should be just as simple as the Argon Dashboard (which used EJS for templating) yet with some minor additions to have React up and running.
Since we’re going to use NodeJS and Docker again, if you’ve followed the first step of the previous tutorial you can skip the Prerequisites needed for starting/using Material Dashboard React.
Follow the prerequisites installation here: https://medium.com/udevoffice/how-to-setup-a-development-environment-using-node-js-and-docker-argon-dashboard-c5bc4fb6aee7
1. Prerequisites
- NodeJs
- Git (optional but useful)
- An IDE (Visual Studio Code)
- Docker
- Material Dashboard React
Assuming that you’ve successfully managed to install all the required prerequisites, we’ll go to the next step, which is the project configuration!
2. Project configuration
Let’s make use of all the things that we’ve installed so far and get to work!
First of all, start Visual Studio Code then go to File -> Open -> Desktop to select the initial working folder. Then open up the terminal inside the IDE, so we can safely stay within it and not tab out of multiple apps: View -> Terminal and in the bottom part of the screen (in the terminal), type mkdir Projectsto create a folder named Projects, then access it via terminal using cd Projects command.
We are going to use Material Dashboard React for this, live preview here.
Head to the Creative Tim website, create an account if you haven’t already and download the archive or use GIT, as we did in the previous article, using the following command in the VS Code terminal
git clone https://github.com/creativetimofficial/material-dashboard-react-nodejs.git
This will clone (download) the Material Dashboard React archive and unzip it into a folder named material-dashboard-react-nodejs-master which will become the project folder or also called Root Directory.
Now that we have a project to work with let’s start with installing the required dependencies. This time, compared with Argon Dashboard, we’ll have to do it twice, because the frontend and backend are treated as two separate applications that communicate with each other to form the dashboard as a whole.
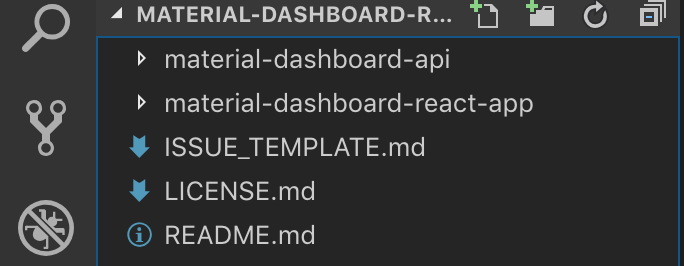
You should have seen until now that there are two folders inside the material-dashboard-react-nodejs-master folder:
- material-dashboard-api
- material-dashboard-react-app

Install the dependencies by going into each of the two folders and running npm install:
- 1.
cd material-dashboard-api && npm installto install the backend dependencies - 2.
cd ..to go back into thematerial-dashboard-react-nodejs-masterfolder - 3.
cd material-dashboard-react-app && npm installto install the frontend dependencies

With the dependencies installed, we now have to create the Docker containers but, if you already have some already created/running containers that run on default ports that PostgreSQL and REDIS use, ( 5432 and 6379 respectively ) we will have to take a decision, either delete the other containers or, change the ports that the containers we’re going to create will run.
OPTIONAL — Stopping and deleting containers
First of all, we will check to see if we have any containers created or running, especially on the ports that we’ll use (5433 and 6380) using the following command:docker ps -a

In this case, we should first start by stopping them. For that, we’ll either select what containers to stop by running docker stop cc8b 4c54 command (cc8b is the container ID for PostgreSQL and 4c54 is the ID for REDIS, in my case) or docker stop $(docker ps -a -q)to stop all of them.

Let’s assume that we have more containers, some of them that we do not want to remove as they would not interfere with our stuff. We’ll only remove the ones that can cause us problems. We can achieve that just as we did with stopping, but instead of docker stop we’ll use docker rm CONTAINERID (we can also use the first 3 or 4 characters of a container ID, instead of the whole string)
docker rm cc8b 4c54 to only remove PostgreSQL and REDIS containers in my case and docker rm $(docker ps -a -q) to to remove all containers.

OPTIONAL — Changing PosgreSQL and REDIS containers ports
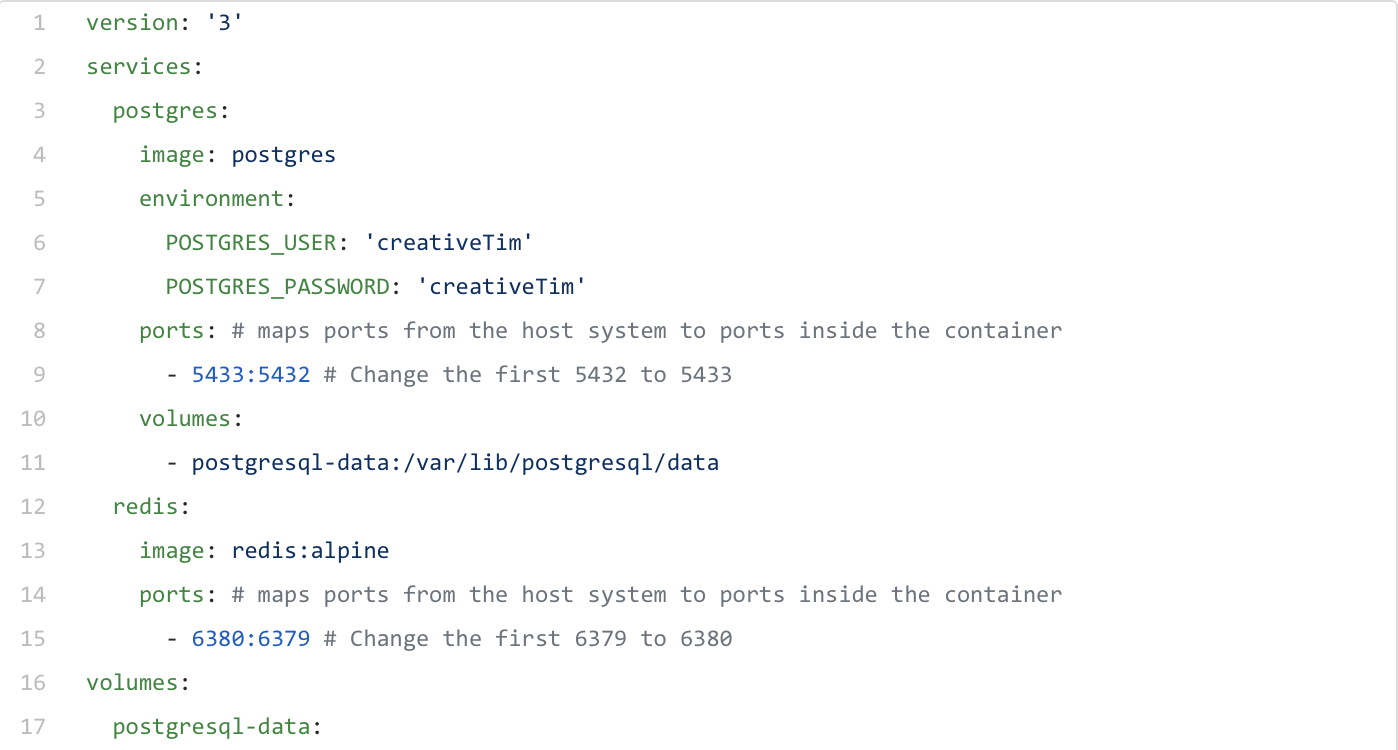
We already have the ports changed inside the docker-compose.yml file!
Changing PostgreSQL and REDIS ports is quite easy, mainly because of the awesome thing called docker and the flexibility of environment files!
All we have to do is to open the docker-compose.yml file and change the ports a little as in the example below:

This will result in having the new PostgreSQL and REDIS containers run inside docker on different ports than the one that we already have.
Running docker ps -a should now display something like this:

To have the server actually connect to the newly created containers, we’ll have to edit the environment file as well, by opening the development.env file from material-dashboard-api -> env-files and change the following variables as below:
DATABASE_URL=https://creativeTim:[email protected]:5433/creativeTim

DATABASE_PORT=5433

REDIS_URL=redis://:@127.0.0.1:6380

REDIS_PORT=6380
Having the database up and running means that we should now run the migrations to create the tables and columns and since we are on this, let’s also run the seeds using cd .. then cd material-dashboard-api && npm run knex migrate:latest && npm run knex seed:run command.

3. Starting the applications
Start the server by running npm run start:staging and then the react frontend using cd .. then cd ../material-dashboard-react-app && npm run start:dev command.

This should be it. Enjoy this cool dashboard and start doing your thing! Send us an email or a message with what you’ve achieved, we would be more than glad to see!
The tutorial was made relying on a macOS device but should most definitely work on Windows devices as well. If I missed something, let me know!


![15+ Top Black Friday & Cyber Monday Deals for Developers and Designers [2023]](/blog/content/images/size/w960/2021/11/black-friday-deals-developers-1.jpg)
